Welcome to our in-depth guide on wallpapering, a beloved part of our "Painting and Decorating" section here at DIY Home Tips. If you've ever considered adding some flair to your walls, wallpapering might be an option that's worth exploring. We'll walk you through everything you need to know, sharing some insights and tips that could be helpful as you embark on your wallpapering adventure.
Why Choose Wallpaper?
Wallpaper can offer some benefits. It's a way to add texture, pattern, and color to a room, offering a range of styles that paint alone doesn't always achieve. From bold, artistic designs to simple, elegant patterns, wallpaper can suit many tastes.
Types of Wallpaper
Before you start, it’s helpful to know the various types of wallpaper available:
- Vinyl Wallpaper: This is often used because it's durable and easy to clean. It's generally suitable for rooms like kitchens or bathrooms.
- Non-Woven Wallpaper: Made from a blend of natural and synthetic fibers, this wallpaper is known for being breathable and easy to hang and remove.
- Textile Wallpaper: Offers a rich texture and appearance but is more challenging to clean and maintain.
- Peel and Stick Wallpaper: A temporary solution that's ideal for renters or temporary projects. It's easy to apply and remove.
Tools and Materials Needed
To get started with wallpapering, gather these essential tools and supplies: Tools and Equipment
- Wallpaper rolls
- Wallpaper paste (if not using peel and stick)
- A good quality paste brush
- A sharp utility knife or wallpaper cutter
- A smoothing tool or roller
- A measuring tape and level
- A plumb line
- A seam roller
Preparing Your Walls
Preparation is arguably the most important step to ensure a smooth finish. For example, proper preparation is crucial for both Bathroom Renovation and Painting and Decorating.
- Surface Cleaning: Remove any old wallpaper, peeling paint, or debris. Clean the walls thoroughly to ensure the wallpaper adheres well.
- Priming: Apply a primer if your walls are porous or have been patched.
- Smoothing: Fill any imperfections with filler, and sand the walls if necessary.
Step-by-Step Wallpapering Guide
Measure and Cut: Measure your wall’s height and add a bit extra (about 2 inches) for trimming. Cut the wallpaper into strips.
Apply Paste: For non-pasted wallpaper, use a paste brush to apply an even coat of wallpaper paste.
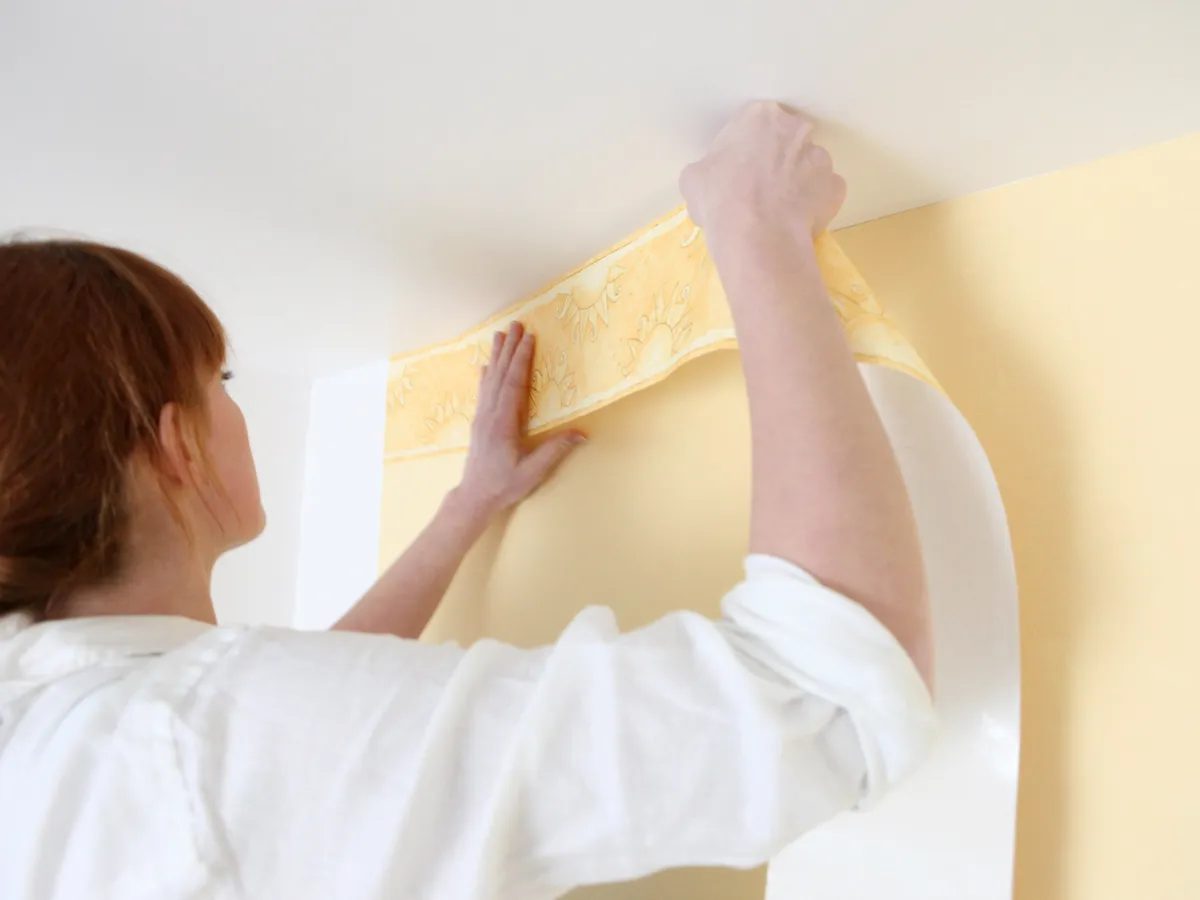
Hanging the Wallpaper: Start hanging from the top, allowing a small overlap at the ceiling. Use the smoothing tool to remove any air bubbles as you work your way down.
Align Patterns: Make sure any patterns are properly aligned as you hang subsequent strips, adjusting as needed.
Trimming Edges: Use a sharp utility knife to trim excess wallpaper at baseboards and ceilings.
Seam Rolling: Use the seam roller on the edges to firmly press the seams and ensure they lay flat.
Aftercare and Maintenance
Once your wallpaper is up, some simple care can keep it looking fresh:
- Regularly dust your walls to prevent dirt buildup.
- Use a soft cloth to clean any stains; a slightly damp sponge can help with non-porous wallpapers.
- Check seams periodically to ensure they're sticking properly.
Final Thoughts
Wallpapering can be a rewarding project that adds personality to your home. If you proceed with care and patience, the result can reflect your personal style. Always feel free to seek advice from professionals if you have any doubts, as they can offer guidance tailored to your specific situation.
If you’re new to wallpapering, start with a small room or accent wall to get a feel for the process. And remember, it’s perfectly okay to make some mistakes along the way; each one can be a learning opportunity, contributing to your growing expertise in home improvement.
Sources & Further Reading:
- The Wallpaper Guidebook by Jane F. Sneed
- Interior Design Basics: Wallpapering Techniques
- DIY Network’s Guide to Wallpaper
We hope you find this guide helpful as you explore wallpapering. For additional tips and project ideas, feel free to browse the other articles on our website. Happy decorating!